Friday, 14 April 2017

Bird body prototype progress


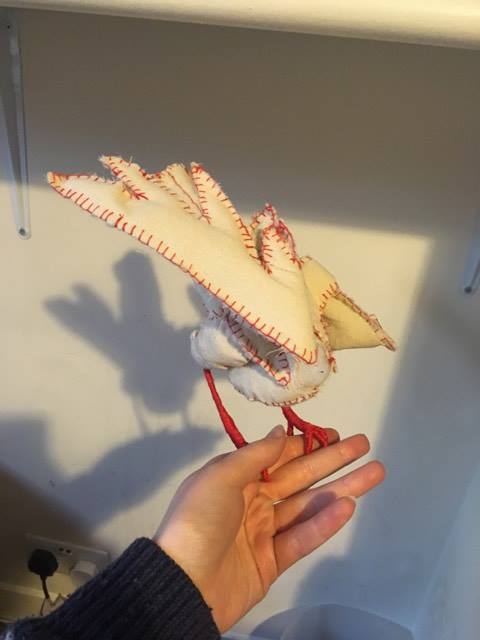
These photos show two different poses and ways the bird can sit. The feet feel delicate and like real little toes! I'm so happy with how this has turned out so far! The visual differences between folded, angled wings and outstretched, flying wings can also be seen. I'm also pleased with the scale of the bird; it's 1:1 and fits nicely in my hand, which is what I wanted to achieve. 
My next step will be to sculpt a head to fit this, and begin figuring a way to affix this. 
I would also like to create a tail to balance out the body and have a base to  potentially sew longer tail feathers too. 

Tuesday, 11 April 2017

Wing progress and assembly


At this point both of the wings have been finished; poseable, with a wire skeleton armature and hand sewn plush exterior. They're symmetrical and would be ready to have feathers sewn into them, or perhaps other conventional materials?


The next step was to sew them into the body section, This was done after affixing the legs onto the body piece. I wanted to make sure there was enough room for the legs as they take up more space than the wigs do. I pinned them in place at first to check the positioning of them, then sewed in several anchors to attach them without compromising mobility. 

Monday, 10 April 2017

Second leg and assembly and wire experimentation


For the second leg I decided to experiment with a different kind of wire to see how it would affect the mobility of the piece. This wire was a lot thinner, so I assumed it would be more flexible but with less strength behind it. It was, however, a lot easier to twist together; the metal is so soft it makes it extremely to connect and intertwine.


After finishing this leg, I discovered it was indeed quite a bit weaker than the thicker wire I used for the main length of the first leg. The joint between the stuffed thigh piece and the red leg piece is especially weak, which is one of the essential joints and places that needs support. This is especially vital is posing the model for stop motion; it needs to be able to support the rest of the puppet without fear of movement or slippage. Because of this, I feel that the wire materials used for the first leg were more suitable. 
Once the leg was complete, I hand sewed both onto the body piece, finishing off with a jot of glue. I would ideally like these legs to be rotatable at the joint between the thigh and the body, but for this project I'm going to focus more on the mobility of the wings, secure in the knowledge that most of the legs have the flexibility of the wire. 


Thursday, 6 April 2017

Leg and foot construction


1) I cut a simple back leg/ bird thigh shape, from a small and basic paper pattern which I measured next to the body. These calico pieces were then pinned together to keep them in place.

2) These were then hand sewn together, with a gap at the front to allow the wire armature inside later. Two of these thigh pieces were made, then put to the side for now.

3) I formed a foot shape from the wire, then covered in two layers of masking tape. This was done quite precisely, as I didn't want to make the same mistake of making them too bulky. I cut the masking tape up into very small rectangles in order to place them accurately.

4) Red cotton was then wrapped tightly around the skeleton, so the whole leg, foot and toes are now completely poseable!

I'm really pleased with how this has turned out! I'm glad I've achieved the mobility I wanted, whilst maintaining the desired shape and strength!

Monday, 3 April 2017

Bird Maquette body pattern.


To begin figuring out the pattern for the body, I first created a paper mock-up to look at sizing and overall shape; I didn't want it to look too boxy.

At first the pattern came out too small, then too long. Finally I achieved a shape I was happy with, and matched the kind of bird I was basing the design on.

Material experiment 2: Masking tape


The wire was twisted together in order to form the claw shape I wanted; no use of adhesives was necessary here. I then layered up masking tape to the desired thickness. 


Once the masking tape was layered up enough, I wrapped some cotton around for texture then painted red with acrylic paint.
I feel like this design was too bulky though, so although it had the desired effect I'll probably use a lot less tape next time. 

Saturday, 1 April 2017

Material experimentation: Wire and thread


To begin experimenting with the feet of the maquette, I decided to make some scaled up prototypes to see what kind of materials worked well together.
For the first one, I simply wrapped red cotton around wire that had been twisted into the desired claw shape. The cotton was wrapped tightly until the whole foot was covered, then the thread was secured with PVA glue.

I like how this prototype worked out, but feel that it looks a little thin? So would like to experiment with layering and making it thicker, or a use of thicker materials.