Prometheus: Character footage, movement and characterisation. from Lily Greenhalgh on Vimeo.
On location, using our environment to create characterisation and emphasised movements. We also played with depth of field, and took advantage of the pillars and structure of the room in order to create this effect.

Monday, 5 June 2017
Prometheus: Character movement exploration from Lily Greenhalgh on Vimeo.
Exploring the ways this character moves. On set in full costume with model and assistant photographer.
Exploring the ways this character moves. On set in full costume with model and assistant photographer.
Final photos of Prometheus model.


A giant maquette used for stop motion, this was inspired by the large models Laika studios use in their films. They're known for large scale and incredible technology in the stop motion industry. I wanted it to look other worldy, immortal, godlike or spiritual so I chose to use mixed media; deciding on textures, patterns and shapes that could represent this.
My project became an exploration of unconventional materials, as well as experimentation of how to fully realise a character through different mediums.
Whilst creating this model, I let the fabrics fall naturally, and simply anchored them in place to achieve a better natural flow. Overall I wanted a swirled, shadowy kind of vibe; something you wanted to reach out and touch, or appeared like it was moving. To help this, I tried to suit the materials to where they sat on the model, as well as making an attempt to hide most of the seams to make it a little neater.
A visiting animator informed me of the professional use of chicken wire, which is what gave me the confidence to use chicken wire for the base of this model.
Overall I'm happy with how this has turned out; there were definitely moments it looked too messy or not professional enough, but as a finished model, I'm actually quite pleased with how it's come together at the end. In the photo above, you can also see the little maquette I made beforehand as a practise!
Final photos of mask and theatre realised Prometheus.


Here are a collection of my favourite shots from the photoshoot! I'm so pleased with how these have turned out, the lighting of the cathedral we were in only lent itself to the airy, spiritual vibe I wanted to create. In using a cathedral as a setting, it was mimicking and assisting the religious imagery that I was focussed on with this realisation of the character. Even though a lot of my work this during this assignment has been based around stop motion, my love for theatre, costumes and prop-costume such as masks meant that I didn't want to pigeon hole myself entirely, as I really enjoy camera work of all types. Whether it's stop motion, film making or getting stills like these, I really enjoy realising the character through other mediums; I feel that this way we can learn more about the character. Through this practise I was able to explore how the character moves, sits, holds themself etc.
The model is Jack Taylor. Assistant photographer was Yasmine Lahouag.
Sunday, 4 June 2017
Costume variation: Photoshoot preparation and sourcing

In exploring the characterisation of Prometheus as well as showcase my work in another light, I wanted to work on modelling in the medium of costume as well as simultaneously working on the maquettes I've been focused on. I feel this could add to the characterisation of the fox-spirit as well as give me an opportunity to work with camera; both in moving image and stills, which I think was one of my strong points in previous projects. I was lucky enough to have two models to choose from! I got all the outfits I had sourced and had them both wear them in order to see which I though suited the character better. Although I prefer the height of the model on the left, I think the tattoos and aesthetic of the model on the left work better with the themes and visuals I've been working on for this character!
Saturday, 3 June 2017
Final base coat

Image shows the final white spray paint base coat for the mask. Using this kind of high quality paint also left it with a smooth and shiny surface, which I was really happy with! I then left this to dry outside.
Ears update: sanding and painting

Once I had cut the ears to the correct size and sealed the three layers together, I used the heat gun to warp and shape the ears into the curved shape I wanted.
I then sanded the corners down so they were smoother, as the heat and forming the curves of the ears created slight rolls in the worbla. Once I was happy with the overall shape, I painted the ears to match the colour scheme of the mask.
Ears: Worbla thermoplastic experiments

1) Taking the original foam template and decreasing it in size slightly.
2) The new foam cut out sizing in comparison to the original.
3) The foam piece is sandwiched between two sheets of Worbla thermoplastic.
4) I glued the foam down to stop it from sliding about, then used a heat gun to soften the thermoplastic. I then pressed the edges together forming a seam that fused together.

Here shows the ears against the mask so far; the mask was being sanded down at the time.
Friday, 2 June 2017
Prometheus model: detailing

Close up images of the kinds of materials and textures I'm working with. I decided on mixed media in order to portray a patchwork and pieced together kind of disguise that the character made themselves. I almost wanted it to look as if it had movement running through it, but equally wanted the viewer or observer to want to reach out and touch all the different textures, fabrics and patterns.
Update: Prometheus model

Inspecting the silhouette:
I'm not going to simply stick this sheet to the model, it's just to check how the final silhouette and colour choices will appear alongside the overall shape.
The second image shows the model almost covered in a variation of fabrics. All were hot glued into place, and I placed them in such a way that flowed with the form of the plaster bandages, e.g. small clustered swirls in the dips, and long stretched pieces of leather on the flatter planes.
Wednesday, 31 May 2017
Foam ear experiment

Whilst sculpting the clay ears I was realising more and more how heavy they were getting. The thickness around the bottoms of the ears was also building up, so it would be impossible to stick the ears to the mask while still being about to see through it. Even though I've spent a lot of time sculpting and figuring out techniques and materials, I feel like I may have to give up on that process. Instead I've started looking at a lighter, quicker and more flexible method. Above shows the experimentation using scrap foam sheets; here I was figuring out the pattern and shape that I wanted the ear to be.
Monday, 29 May 2017
Mask Fabrication: Sanding and filling

1) The covered ear beginning to be sanded smooth.
2) The difference between a sanded and un-sanded surface. The light and dark patches show where the dips and lumps are, so can guide you were needs filling.
3) Stage one of sanding complete! One of the ears was more cracked than the other so needed extra support on the inside.
Sunday, 28 May 2017
Mask Fabrication: Ears

After sculpting an ear out using air dry clay and chicken wire for support, I decided to attempt using these as the final things. Speaking to a technician, Emma suggested that I use the milliput to coat the ears in, in order to stop them from cracking, meaning I wouldn't have to re-sculpt something I was already happy with too.
I began this process by mixing up equal amounts of the two part epoxy putty, then squishing small, thin circles together, blending them together to create a thin layer about a millimeter thick over the whole sculpt.
Thursday, 25 May 2017
Mask priming: sanding and filling

1) Spraying the first layer of primer onto the mask. This highlights the bumps and where needs to be sanded down, or built up a little bit more.
2) Close up of the detailing. The bumps are where I've applied the milliput and it still needs to be smoothed down.
3) After a few layers of sanding and filling: The grey paint mattifies after being sanded and more milliput has been built up in the areas that have dips.
4) After another layer or so of sanding, filling then spray painting, I circled the areas that needed filling to assist myself in remembering what areas needed attention.
Wednesday, 24 May 2017
Mask Fabrication: Progress

I've now re-sculpted in the details that were lost in the process of vac-forming. Once these have dried, I'll sand them smooth, then prime the whole thing. Several coats of primer paint and a few sessions of sanding and filling may be necessary to get the mask flush and smooth at every 'seam'.
The edges of the mask were hand sanded, and the eyes cut out with a sharp pair of tin snips, then hand sanded and filed back. They still need some re-shaping done at this point though so ensure safety of the wearer, good vision and clean edges.
Sunday, 21 May 2017
Mask Fabrication: Repair work, sanding and filling.

I began by marking out the areas that needed defining. These were the brow, cheek, nose, muzzle and chin areas. 'Milliput' is a two part epoxy putty that goes rock hard after being left for a few hours, and is sandable, mouldable, sculptable, and smoothable with water. It was a quick and easy way of sanding and filling, and was everything I needed it to be in terms of drying time and flexibility. The second image shows the beginnings of cutting out one of the eyes, as well as progress showing a more fleshed out mask.
Friday, 19 May 2017
Mask Fabrication: Post-vac-forming


The air-dry clay crumbled very easily out of the plastic, so it would've been impossible to cast from this sculpt again. After cutting it out of the leftover plastic, the edges were a bit chewed up. I'll be able to fix this with some simple re-shaping and sanding though. I could either do this using a course sandpaper and do it by hand, or possibly use a dremel. A belt-sander would be way too aggressive for this though. The last image shows the current sizing and overall shape of the mask. I can't say I'm not disappointed with how the mask turned out, as I was really happy with the sculpt, so for it to mess up at the final stage is a little annoying to say the least. It also means I have to put a lot of restorative work into it now, whereas if it had taken properly then I could be onto the painting stages by now.
Monday, 15 May 2017
Vac-forming process
Vac-forming process from Lily Greenhalgh on Vimeo.
Unfortunately something went wrong with the vac-forming process! You can see at about 00:10 the details start to come through, but at 00:11 there's a small pop and the details are lost. Seeing as the heat from the vac-former will have dried the clay, we only really had one shot at vac-forming the mask. This means a little extra work, and some problem solving.
My current options are:
1) Sculpt and vac-form the mask all over again.
2) Add details to this vac-formed version.
3) Try and get the clay out and attempting to vac form it again.
The most time, material and cost efficient option was 2); Essentially I have to use some epoxy putty to sculpt the missing features onto the mask. This does mean quite a bit more time will be spent on this mask than I had initially planned, throwing my time schedule out slightly, so I'll have to compensate by putting more hours into the mask, staying later or working faster to keep up to date. These things are sent to try us!
Mask Fabrication: Vac-forming

The mask had to sit lifted from resting on the vac-former, as air had to get underneath it in order for the process to work; we used two little pieces of wood to lift it up. The mask had to have a few little repairs again before it was vac-formed, but the whole thing was dry enough to be used.
Thursday, 11 May 2017
Mask Fabrication: Ears

After prototyping a quick ear sculpted in air dry clay (for sizing and shape reference) I decided to experiment making the ears with the same material, only this time I gave it an inner-structure of chicken wire to support it and potentially help with the inevitable crumbling. This was simply to experiment with the material and different ways of working with it further.
In the first image you can see me checking the wire against the mask sculpt to make sure it wasn't too big or small.
The second image shows beginning to pad the clay around the wire, beginning to see the shape.
The third image shows the rough sculpt with details. It was hard to hide the wire without the sculpt becoming too thick, but I liked the overall look of it.
Monday, 8 May 2017
Mask Fabrication: Small repairs

Before vac-forming, there were a few minor repairs I had to make simply by blending some clay into the cracks that had appeared. This tends to happen naturally as the clay dries and the water evaporates out of it, so unfortunately it can't really be avoided. This is why I prefer sculpting in other materials if air-dry clay can be avoided, but seeing as I wanted to vac-form this mask due to time restraints and budget, air dry clay was the way to go! A small hurdle, but very easily fixed.
The cracks can be seen around the eyes and the top of the forehead; this also indicates where weaker points may be, so are often in corners or detailed areas.
Friday, 5 May 2017
Mask Fabrication: Refining and detailing

At this point I've used water and brushes to begin smoothing out the sculpt. The features are how I want them (seen in the second image). As this kind of clay is air dry I covered the sculpt in cling film to make it air tight to it wouldn't dry out before vac-forming it later.
The reason I chose air dry clay over chavant is because chavant would melt in the vac former!
Wednesday, 3 May 2017
Mask Fabrication: Shaping and Smoothing

Now we can see the features of the mask beginning to show! Definition in the eyebrows, pointed cheeks and nose can also be seen. I also had to pay special attention to the edges of the mask; if too thin these will be the first bits to crumble, so made sure they were padded out nicely. I also made sure that the edges of the mask would extend enough to cover the sides of someones face too, instead of not being tall/ wide enough.
Sunday, 30 April 2017
Mask Fabrication: Blocking out

I began shaping out the mask by blocking out the overall form using rough balls of clay. This allowed me to begin to figure out and understand the initial form that the mask would take. Once I had the shapes blocked out, I smoothed out the separate blocks so I could start roughly adding details and refining the base shapes.
Friday, 28 April 2017
Mask Fabrication: Preparing the cast

I was lucky enough to have a plaster-cast bust to work on, so I wanted to preserve it the best I could in order to use for further projects later on.
Firstly I sat it up at an angle for the comfiest sculpting position. I then wrapped it in cling film to protect it from getting too messy, as well as to allow complete removal of the mask sculpt, if and when necessary. Finally I drew in the eye shapes using a simple board marker, to make sure I didn't sculpt over the essential areas that needed to be left alone.
Tuesday, 25 April 2017
Bird mask: Painting and sealing

After priming the mask with a dark brown, I painted it using acrylics. I wanted to re-enforce the fact that this was a mask a bird was wearing as opposed to the face and head of the animal itself, so went for a leathery kind of appearance, with faded marks around the eyes, highlights around the different panels and small white dots showing where the seams are. Overall I'm relatively pleased with the paint job, but feel I should've used a lighter primer, as the colours wouldn't really lift after a dark backing tone was put down.
Once this was dry I used a clear lacquer gloss to seal it and provide a slight shine.
Bird mask: Moulding and casting

1) Seeing as the little bird mask sculpt didn't have a flat back to it, I had to cast it by means of a two part mould. I began this by finding a container that would fit the sculpt whilst still accommodating enough room on every side so the silicone wouldn't be too weak. I then filled half the container, in this case a small ramekin glass, with air dry clay and buried half the sculpt in this making sure it was air tight. Silicone was then poured over the remaining half of the sculpt that was left exposed, and left to set.
2) On taking out this half of the set silicone after the going off time, I accidentally pushed the tool I was using for leverage in getting the mould out of the container, into the sculpt itself. Because of this a little repair work was needed between casting. I also took this opportunity to trim down the silicone to fit back into the same container; it had a rim to it, so needed to be cut back down to size.
3) The second half of the mould after it had been cast: Quite a bad mould really, with a lot of airbubbles, but in no place they couldn't be simply sanded quickly away once the mask piece was cast so I saw no reason to completely re-cast this half. This half of the mould is also a slightly darker green; I put more catalyst in so it would go off a little faster this time.
4) The resin cast straight out of the mould pieces! It worked! My next step will be sanding down the edges that were left where the two mould pieces met.
Monday, 24 April 2017
Complete bird prototype

Images above show the completed bird prototype! I'm so happy with how this came out; I was able to experiment with different materials and methods to see what worked best. I feel like I'll be able to go on and make replicas of these, (or at least different breeds of birds using similar processes) a lot more confidently now. Understanding even small details such as 'which kind of wire is appropriate for which parts' was integral in figuring out how to carry this forward and make something successful from it.
This prototype could either go forward and be painted and detailed, or I could leave it as a demonstration of the progressive creative processes that have occurred during this project. Depending on time restrains I'll either paint it and finish it, or leave it as it is to demonstrate an example of prototyping.
Sunday, 23 April 2017
Bird Mask: Resin casting

1) This first image shows the mould after the silicone was poured in and allowed to set. This is how it looked when I came in to de-mould the following morning.
2) The mould after the plastic wall was stripped off.
3) After peeling off the silicone mould from the base board, the chanvant 'neck' base and air dry clay plugging could be seen. The clay simply crumbled away from the silicone, but I had to cut the mould slightly and dig out the chavant. This was okay though, as the silicone mould would have had to be cut in order to get out the resin casts later on. I then cleaned out the mould, ready for resin.
4) After mixing up the correct ratios of resin, I poured the mixture into the mask cast mould, as well as a little prototype maquette mask I'd been working on previously. This would then dry solidly in the next half hour, ready to be popped out and painted or experimented with.
Saturday, 22 April 2017
Bird mask: Mould preparations

1) I began by collecting up the materials I would need to assemble a mould in order to cast the bird mask sculpt. This included a flat piece of MDF, a flexible strip of plastic to form the walls, and a hot glue gun.
2) The next step was securing the sculpt to the MDF surface. The chavant clay stuck to the board itself, but I wanted to be extra careful the sculpt wouldn't come loose while being cast; it could float up through the silicone mid-set and ruin the cast. To secure it I simply smoothed out the 'neck' with some air dry clay. Creating this sloped shape also meant that once the mask was cast it would have a plug-like, spread out base which I could use to stop the head slipping out of the neck hole of the rest of the puppet.
3) Next I created a circular frame for the sculpt, making sure I had at least half a centimetre on every side to ensure a good thickness of mould; if the mould was too thin then there was the potential risk of the silicone breaking. The plastic was taped into place then hot glued to the base, sealing the bottom so no silicone would escape.
4) The last stage of preparation was collecting all equipment needed to begin mould making. This included the two-part silicone, disposable gloves, a set of scales, the sculpt, a mixing pot, a mixing stick and newspaper to protect the surfaces.
Monday, 17 April 2017
Prototype bird mask details

After blocking out and refining the shapes for this mask, I smoothed it out and added details such as the eye loops.
In image 1), half of the face had been smoothed out using a brush and lighter fluid; this dissolves a small amount of the chavant, leaving it smooth. This picture also shows the difference between the circular eye loop before and after being blended into the rest of the mask.
Image 2) shows the finished thing, ready to be smoothed over once more before being cast.
Seeing as the body is quite delicate and light I will have to consider the weight of the mask when casting, and because of this I feel that solid resin would be inappropriate. Currently I'm considering biscuit foam or slush cast resin to be more suitable.
Bird Mask: Final fitted sculpt

Looking back at my previous sculpts, I realised that these masks would be too small for the 1:1 scale I created the prototype bird body in. I also realised that by simply sculpting out the mask alone, without a head there would be nothing to stick it too. I can solve this problem one of two ways; Either sew and stuff a small, featureless ball to act as a head shape that the mask could then rest on, or simply include the head in the mask sculpt. For this prototype I decided to sculpt the head into the mask, to save on time and to experiment with whether this looks good or not.
1) Blocking out the base shape for the bird mask. For this prototype I was looking at jay birds for reference; the American blue variation sporting a small peak of feathers at the back of the head, which I felt was a key characteristic in distinguishing the features of this bird. The blocking out was simply done with my hands; no tools where needed at this point.
2) Begin using tools; smoothing out the shape to begin figuring out features and seeing what kind of shapes I'm working with.
3) Using references to refine shapes.
4) Adding in a neck piece to connect the body with the head. To make sure the final thing will fit, I held this against the opening of the neck and made sure to regularly check that it could still connect.
Friday, 14 April 2017
Tail construction

After figuring out the sizing, I cut two simple pieces from calico and stitched one side together. A piece of folded wire was slotted inside creating a rectangular shaped skeleton; this was so it could be bent and posed with the rest of the puppet. I also decided to put a small amount of wadding inside the tail as well, to fill it out a little bit rather than have it look too flat or thin next to the rest of the puppet. I then stitched the other sides together and attached it to a seam at the back of the bird. I put some simple lines down the tail to give a little more definition too. The images show what it looks like from above and below.
Bird body prototype progress

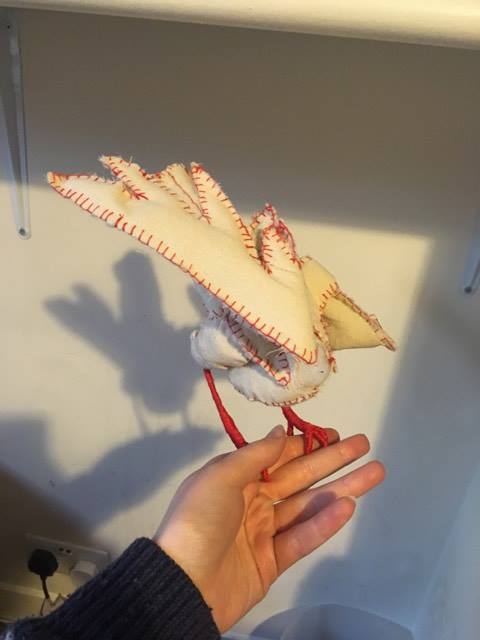
These photos show two different poses and ways the bird can sit. The feet feel delicate and like real little toes! I'm so happy with how this has turned out so far! The visual differences between folded, angled wings and outstretched, flying wings can also be seen. I'm also pleased with the scale of the bird; it's 1:1 and fits nicely in my hand, which is what I wanted to achieve.
My next step will be to sculpt a head to fit this, and begin figuring a way to affix this.
I would also like to create a tail to balance out the body and have a base to potentially sew longer tail feathers too.
Tuesday, 11 April 2017
Wing progress and assembly

At this point both of the wings have been finished; poseable, with a wire skeleton armature and hand sewn plush exterior. They're symmetrical and would be ready to have feathers sewn into them, or perhaps other conventional materials?

The next step was to sew them into the body section, This was done after affixing the legs onto the body piece. I wanted to make sure there was enough room for the legs as they take up more space than the wigs do. I pinned them in place at first to check the positioning of them, then sewed in several anchors to attach them without compromising mobility.
Monday, 10 April 2017
Second leg and assembly and wire experimentation

For the second leg I decided to experiment with a different kind of wire to see how it would affect the mobility of the piece. This wire was a lot thinner, so I assumed it would be more flexible but with less strength behind it. It was, however, a lot easier to twist together; the metal is so soft it makes it extremely to connect and intertwine.

After finishing this leg, I discovered it was indeed quite a bit weaker than the thicker wire I used for the main length of the first leg. The joint between the stuffed thigh piece and the red leg piece is especially weak, which is one of the essential joints and places that needs support. This is especially vital is posing the model for stop motion; it needs to be able to support the rest of the puppet without fear of movement or slippage. Because of this, I feel that the wire materials used for the first leg were more suitable.
Once the leg was complete, I hand sewed both onto the body piece, finishing off with a jot of glue. I would ideally like these legs to be rotatable at the joint between the thigh and the body, but for this project I'm going to focus more on the mobility of the wings, secure in the knowledge that most of the legs have the flexibility of the wire.
Thursday, 6 April 2017
Leg and foot construction

1) I cut a simple back leg/ bird thigh shape, from a small and basic paper pattern which I measured next to the body. These calico pieces were then pinned together to keep them in place.
2) These were then hand sewn together, with a gap at the front to allow the wire armature inside later. Two of these thigh pieces were made, then put to the side for now.
3) I formed a foot shape from the wire, then covered in two layers of masking tape. This was done quite precisely, as I didn't want to make the same mistake of making them too bulky. I cut the masking tape up into very small rectangles in order to place them accurately.
4) Red cotton was then wrapped tightly around the skeleton, so the whole leg, foot and toes are now completely poseable!
I'm really pleased with how this has turned out! I'm glad I've achieved the mobility I wanted, whilst maintaining the desired shape and strength!
Monday, 3 April 2017
Bird Maquette body pattern.

To begin figuring out the pattern for the body, I first created a paper mock-up to look at sizing and overall shape; I didn't want it to look too boxy.
At first the pattern came out too small, then too long. Finally I achieved a shape I was happy with, and matched the kind of bird I was basing the design on.
Material experiment 2: Masking tape

The wire was twisted together in order to form the claw shape I wanted; no use of adhesives was necessary here. I then layered up masking tape to the desired thickness.


Once the masking tape was layered up enough, I wrapped some cotton around for texture then painted red with acrylic paint.
I feel like this design was too bulky though, so although it had the desired effect I'll probably use a lot less tape next time.
I feel like this design was too bulky though, so although it had the desired effect I'll probably use a lot less tape next time.
Saturday, 1 April 2017
Material experimentation: Wire and thread

To begin experimenting with the feet of the maquette, I decided to make some scaled up prototypes to see what kind of materials worked well together.
For the first one, I simply wrapped red cotton around wire that had been twisted into the desired claw shape. The cotton was wrapped tightly until the whole foot was covered, then the thread was secured with PVA glue.
I like how this prototype worked out, but feel that it looks a little thin? So would like to experiment with layering and making it thicker, or a use of thicker materials.
Subscribe to:
Posts (Atom)